Introduction: The DNS Zone Is Not Hosted with Us
The message The DNS zone of is not hosted with us can be confusing and alarming for many website owners, especially if you’re unsure what it means for your site’s functionality.
This notification typically implies that your hosting provider does not have control over your domain’s DNS settings, which could result in a variety of technical issues such as website downtime or email misconfiguration. Understanding this issue is critical to maintaining a healthy online presence.
To put it simply, the Domain Name System (DNS) functions as a guide for directing traffic to your website. If the DNS zone is not hosted by your current provider, it indicates that the server responsible for translating domain names into IP addresses is under the control of a different service.
There are numerous potential causes for this phenomenon, such as the utilization of third-party DNS services, incomplete migrations, or outdated name servers. The good news is that this issue is typically easy to resolve.
This article will investigate the underlying causes of the error and provide a comprehensive, step-by-step methodology for resolving it. Upon completion, you will possess the necessary tools and knowledge to guarantee that your website operates without any further interruptions, in addition to comprehending the underlying causes of this issue.
What Does The DNS Zone Of Is Not Hosted with Us Mean?
The DNS zone is not hosted with us indicates that your website’s Domain Name System (DNS) records are being managed by a service other than your current hosting provider. In layman’s terms, DNS records function as a map, directing users to the correct server when they attempt to access your website. Without effective DNS management, your hosting provider loses control over critical operations such as traffic routing.
When this error message appears, it typically means the DNS zone is configured elsewhere, possibly with a third-party DNS provider like Cloudflare or still managed by your domain registrar. This creates a disconnect, as your hosting provider won’t be able to update or manage your DNS records. This can cause a variety of technical issues, including website outages, misconfigured email services, and even challenges with SSL certificate validation.
Having your DNS records hosted externally without proper synchronization can disrupt critical website operations. Issues like delayed updates, incorrect routing, or communication failures between servers are common consequences. It’s important to address the problem swiftly to avoid disruptions and ensure your website is accessible and fully functional for both visitors and search engines
Why Does This Happen?
Several reasons can lead to this issue:
Third-Party DNS Management
You may have chosen to use a third-party DNS service like Cloudflare or Google DNS. These services are popular because of the extra features they provide, such as enhanced speed or security. However, if your hosting provider doesn’t control the DNS zone, this message will appear.
Mismatched Name Servers
If you recently moved your website to a new hosting provider but forgot to update the name servers, your DNS records will still point to your previous host.
Incomplete DNS Migration
During website migration, if the DNS settings aren’t correctly transferred to the new hosting provider, this issue will occur.
Domain Registrars as DNS Hosts
Some users prefer to leave their DNS management with the domain registrar (such as GoDaddy or Namecheap) rather than transferring it to the hosting provider. This can lead to confusion about who controls your DNS records.
How to Fix The DNS Zone Of Is Not Hosted with Us
Let’s walk through how to fix this issue with a detailed step-by-step guide. Whether you’re a beginner or experienced in DNS management, these steps will guide you in solving the problem and restoring full functionality to your website.
Step 1: Identify Where Your DNS is Hosted
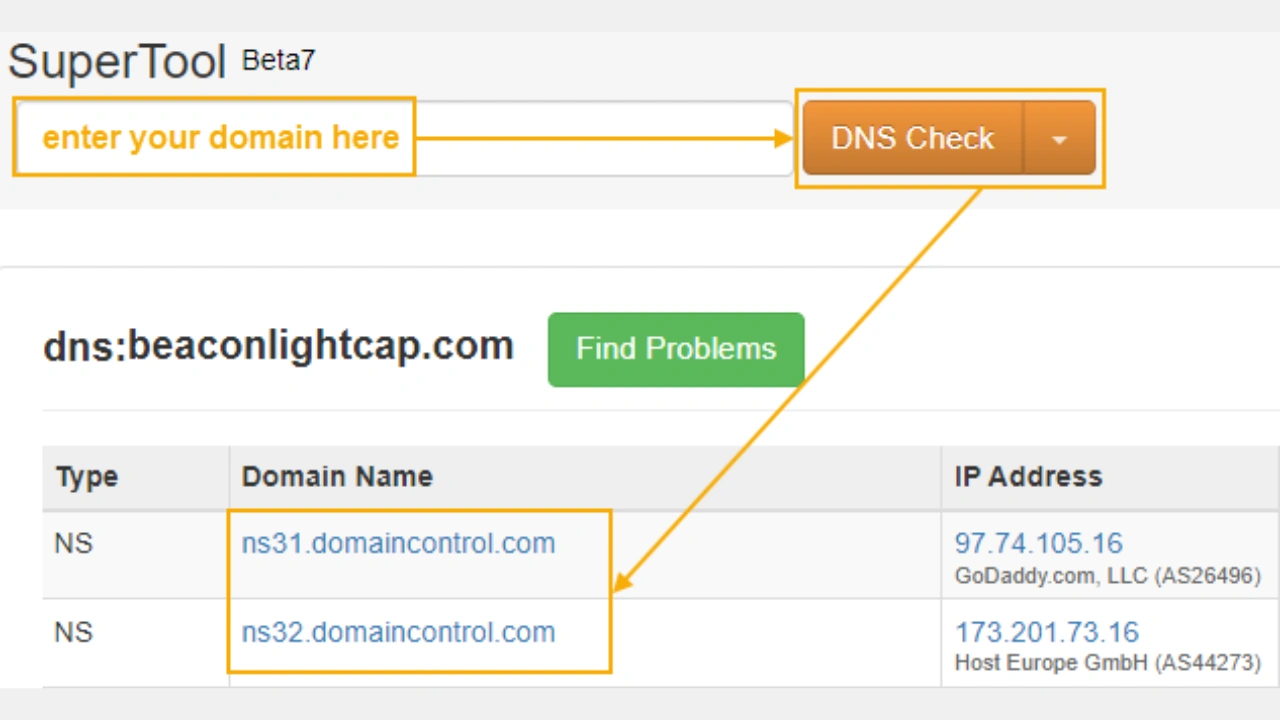
The first step is to determine which service is currently managing your DNS records. Knowing who’s in charge will help you decide the next steps. Here’s how to identify your DNS host:
- Check your domain registrar: If your domain is registered with a company like GoDaddy, Namecheap, or Google Domains, log in to your account and look for the DNS settings. Typically, the domain registrar will display which name servers are currently active.
- Use a DNS lookup tool: Tools like whois.net, DNSChecker.org, or MxToolbox allow you to search for your domain and find the current name servers. These tools are essential for pinpointing who’s managing your DNS records.
Once you know where your DNS is hosted, you’ll be better positioned to decide whether to update the DNS settings or transfer them to your hosting provider.
Step 2: Update Your Name Servers
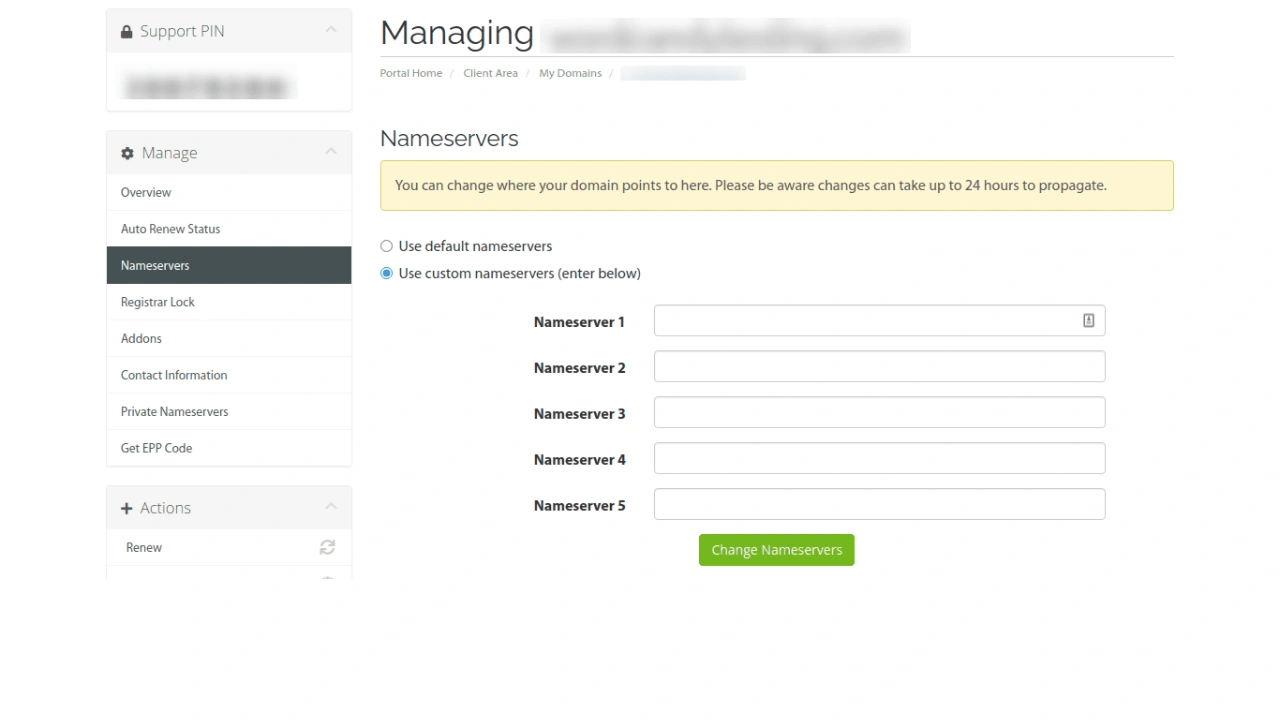
If your DNS is hosted elsewhere and you want to transfer it to your current hosting provider, you’ll need to update your domain’s name servers. Here’s how to do it:
- Log in to your domain registrar’s dashboard.
- Navigate to the DNS or Name Server Settings section.
- Replace the existing name servers with the ones provided by your hosting provider. Typically, these will look something like:
- ns1.yourhostingprovider.com
- ns2.yourhostingprovider.com
- Save the changes.
Note: DNS changes can take some time to propagate across the internet. While this typically happens within a few hours, it can take up to 48 hours for the changes to fully propagate worldwide.
Step 3: Verify DNS Propagation
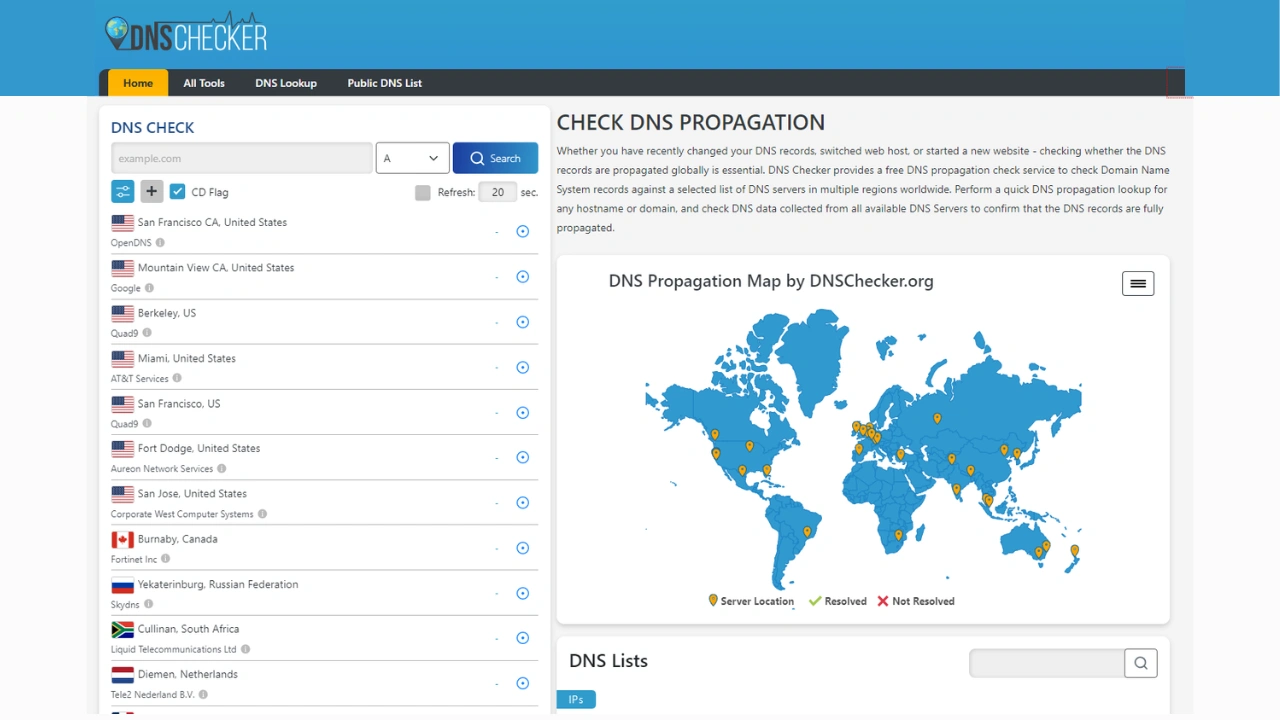
After you’ve updated your name servers, it’s crucial to ensure that the DNS settings have propagated correctly. You can do this by:
- Using DNS propagation tools: Websites like WhatsMyDNS.net or IntoDNS allow you to check whether your DNS settings have updated across different servers worldwide.
- Testing your website: After propagation, try accessing your website in a web browser. If your site loads correctly, the DNS changes have likely propagated successfully.
If the name servers haven’t propagated after 48 hours, double-check your settings and ensure they were entered correctly.
Step 4: Manage DNS Records (If You’re Using a Third-Party DNS)
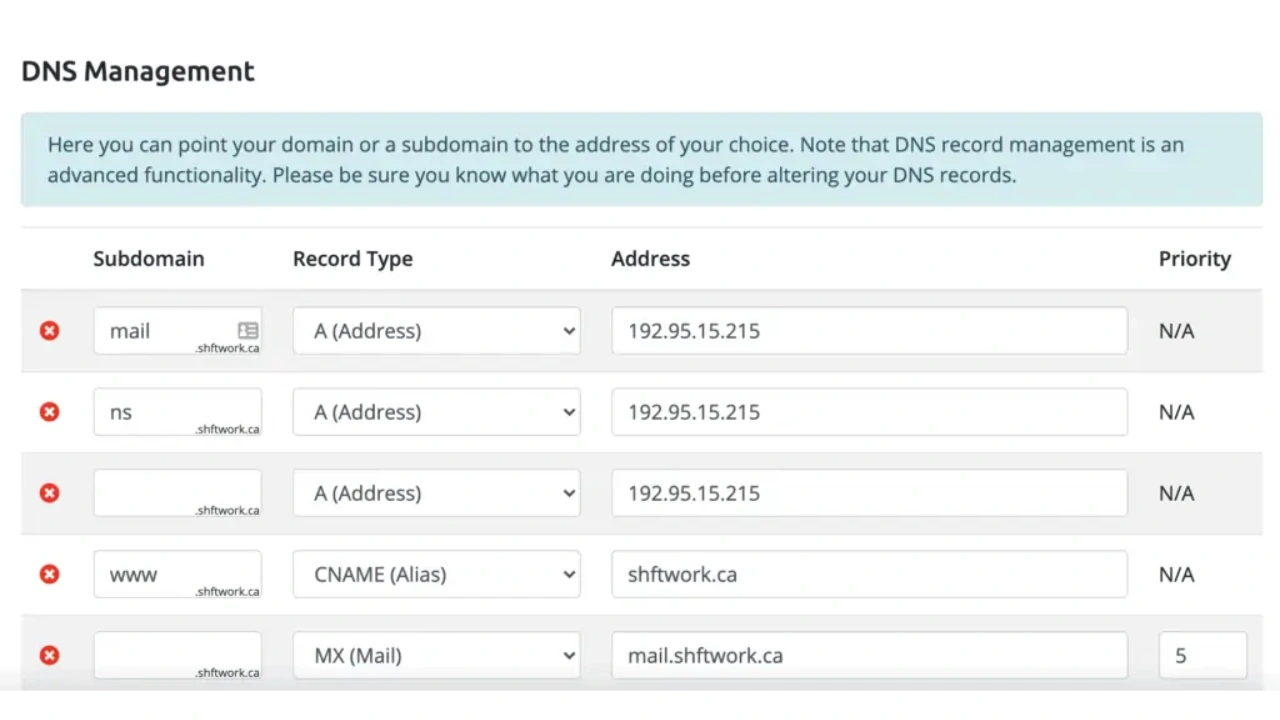
If you prefer not to transfer DNS management to your hosting provider, you can keep your DNS records with a third-party provider. However, you’ll need to manually configure the DNS records to point to your hosting provider. Here’s how:
- Login to your DNS provider’s dashboard (for example, Cloudflare or Google DNS).
- Navigate to the DNS settings page.
- Ensure you’ve added the correct DNS records provided by your hosting provider. You’ll typically need to update:
- A Record: Points your domain to your hosting provider’s IP address.
- CNAME Record: If you use subdomains (like blog.yourdomain.com), you may need to configure CNAME records.
- MX Records: Used for email routing; make sure these are updated to your current email hosting provider.
- TXT Records: For SSL, email verification, or other purposes.
By ensuring that all necessary DNS records are present, you’ll resolve the The DNS zone is not hosted with us issue.
Step 5: Test Your Website and Email Services
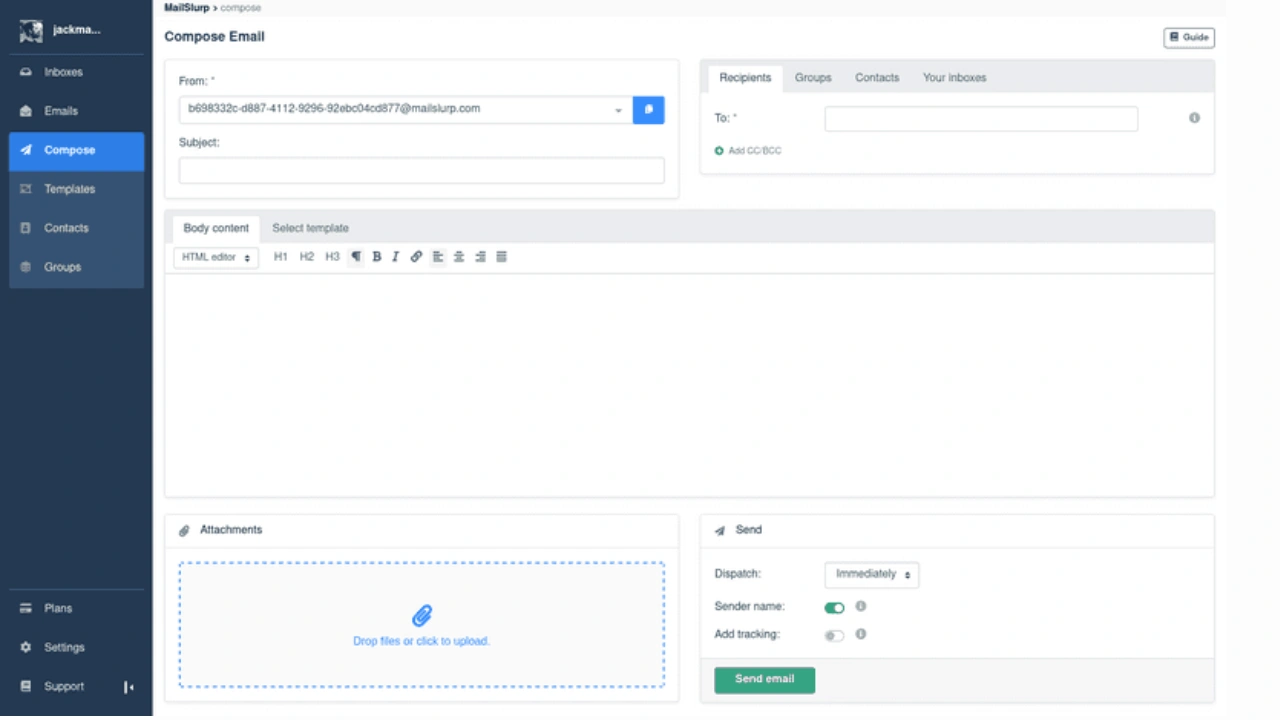
Once you’ve updated the DNS records or name servers, it’s time to test your website and email services:
- Check your website: Visit your website to ensure it’s loading properly. If you encounter a 404 error or other problems, it could indicate that the DNS settings are incorrect or haven’t fully propagated.
- Test email services: If you’ve made changes to the MX records, send a test email to verify that everything is functioning as expected.
If everything works, congratulations—you’ve successfully resolved the DNS issue!
Why DNS Zone Hosting Issues Matter
The DNS system is critical to your website’s general functionality. Without properly configured DNS settings, your website may encounter downtime, email may not function properly, and SSL certificates may fail to validate. These errors can seriously interrupt the user experience and jeopardize your site’s reputation and functionality.
Understanding and addressing the “DNS zone is not hosted with us” issue ensures that your website is available to visitors and search engines alike. Proper DNS maintenance is critical for avoiding technical difficulties that could harm user experience, website speed, and SEO performance. If your DNS records are erroneous or obsolete, search engines may have difficulty crawling your website, resulting in lower rankings.
In addition, a well-managed DNS infrastructure contributes to your website’s security and resilience. When DNS difficulties are not handled, your website may become subject to cybersecurity threats such as DNS hijacking or phishing attempts. Ensuring your DNS records are under the control of a trusted hosting provider can safeguard your site’s infrastructure and data.
Preventing Future DNS Issues
To avoid this issue in the future, follow these best practices:
Update DNS settings when switching hosts:
Whenever you migrate your website to a new hosting provider, always update the DNS settings accordingly.
Consolidate services if possible:
If you’re managing your domain, DNS, and hosting across different providers, it can create more points of failure. Consider consolidating services to one provider to streamline management.
Monitor DNS propagation:
After making DNS changes, always monitor propagation with online tools to ensure your records are updated correctly.
Use professional DNS management tools:
Many hosting providers offer DNS management tools that make it easier to configure and monitor your DNS settings.
Final Thoughts
It goes beyond simply resolving a technical issue to address the DNS zone of is not hosted with us issue and guarantee the smooth operation of your online presence. By taking the effort to fix DNS hosting issues, you may improve user experience overall as well as the dependability and speed of your website. A website that works well builds visitors’ trust and motivates them to come back.
Moreover, keeping your DNS settings aligned with your hosting provider can prevent potential complications in the future. In order to keep ahead of problems and maintain the security and accessibility of your website, you should regularly audit and monitor your DNS records.It’s always better to proactively manage your DNS settings than to react to problems as they arise, which can be disruptive and costly.
Maintaining the reputation and visibility of your brand in a highly competitive digital market requires keeping your website functioning properly. Your entire digital marketing approach can benefit greatly from a strong DNS management plan, which can also improve your site’s performance and search engine ranking.
The DNS Zone Of Is Not Hosted with Us FAQs
1. What is a DNS Hosted Zone?
A DNS hosted zone is a container that stores DNS records for a domain, such as A, CNAME, MX, and TXT records. It tells the internet where your website, email, and subdomains are located. Hosted zones are usually managed through your DNS provider or hosting service like Cloudflare, AWS Route 53, or cPanel.
2. Why am I seeing DNS zone does not exist?
This error usually means your domain does not have a DNS zone created or it’s hosted with another provider. Check your domain’s nameserver settings to ensure they point to the correct DNS provider. If you recently changed nameservers, allow up to 24–48 hours for DNS propagation to complete.
3. What does “DNS zone is locked” mean?
A locked DNS zone means the DNS records cannot be edited temporarily, usually due to ongoing updates, propagation, or provider restrictions. Some providers lock zones during DNS transfers or automated system tasks. Wait a few minutes and try again. If the lock persists, contact your hosting or DNS provider’s support team.
4. DNS zone is not authoritative for certificate domain name — how to fix it?
This error appears when your SSL provider can’t verify domain ownership because DNS records are not being served by the correct nameserver. Ensure your domain’s nameservers point to the correct DNS host and the required TXT or CNAME validation record is added. Give time for propagation and then retry certificate issuance.
5. What is a DNS Zone ID?
A DNS Zone ID is a unique identifier assigned by DNS providers like Cloudflare, Route 53, or DigitalOcean to manage and reference your DNS zone programmatically. It’s used for API updates, automated record changes, or external integrations. You can usually find it inside your DNS dashboard under zone settings or details.

Leave a Reply