How to Fix ‘Not Secure’ Website in Chrome: Security Warning
January 19, 2026 by William
January 19, 2026 by William
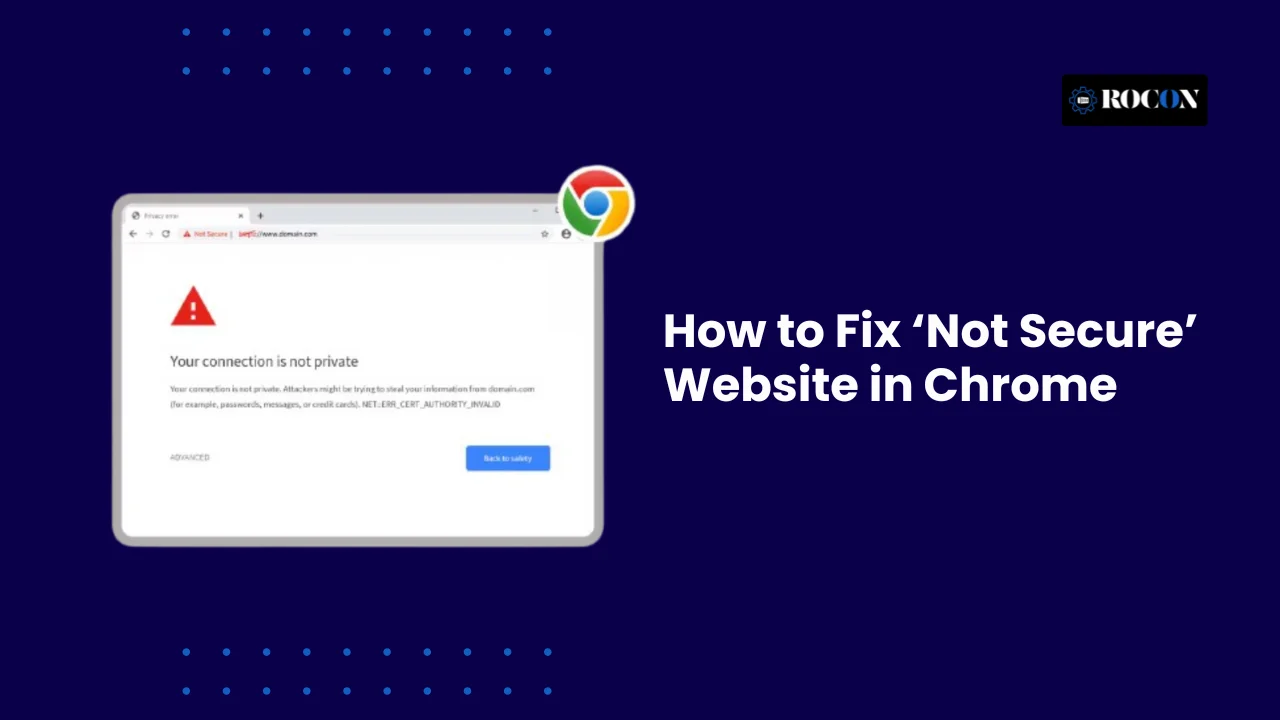
To fix a Not Secure website, you must install an SSL certificate, enforce HTTPS redirects, and resolve mixed content errors. Chrome shows the “Not Secure” warning when your website does not encrypt data properly using HTTPS.
This usually happens when an SSL certificate is missing, expired, misconfigured, or when the page loads insecure (HTTP) elements. As a result, Chrome cannot guarantee a safe connection.
Seeing this warning often scares users. Many hesitate to continue or leave the site immediately, especially if they see a form, login field, or checkout page. Chrome displays this alert to protect visitors from potential data exposure, not to penalize website owners.
Chrome flags websites that do not fully secure user data in transit. Even a basic contact form can trigger the warning if the connection is not encrypted. In some cases, the site uses HTTPS but still loads images, scripts, or styles over HTTP, which Chrome treats as unsafe.
The good news is that a not secure website is completely fixable. When you install SSL correctly, force HTTPS, and remove mixed content issues, the warning disappears. This guide breaks down the exact reasons Chrome shows the alert and explains how to fix it properly—without guesswork or temporary patches.
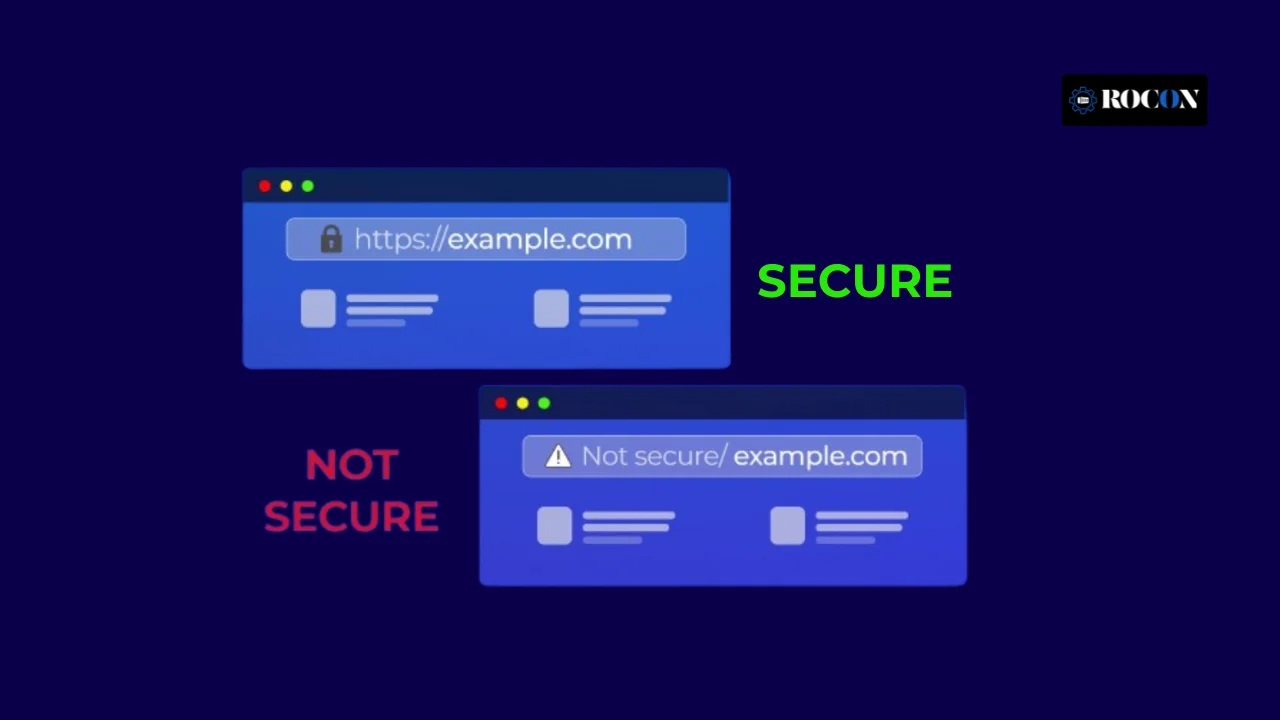
A ‘Not Secure’ website in Chrome means the connection between the user’s browser and your website is not fully encrypted. Chrome cannot confirm that data sent or received is protected. This usually happens when HTTPS is missing or improperly configured.
HTTPS encrypts data exchanged between the browser and the server. Without encryption, third parties can intercept, read, or modify information. This becomes critical when a page contains forms, login fields, or payment inputs.
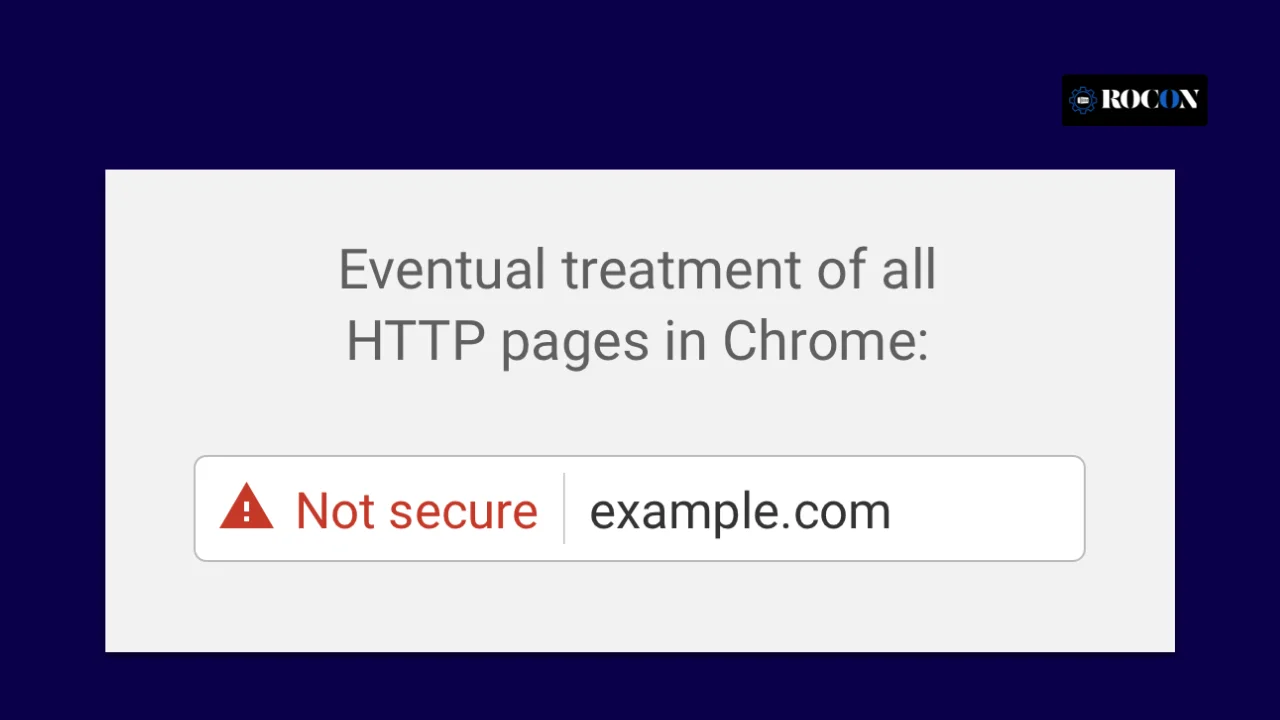
Chrome may also display “Your connection to this site is not secure” in specific situations, including:
This warning does not automatically mean your site is hacked. In most cases, it signals a trust issue, not a security breach. Chrome simply cannot verify a safe, encrypted connection, so it alerts users to proceed with caution.
Once HTTPS is correctly enabled and all insecure elements are removed, Chrome removes the warning and restores the secure padlock icon.
Learn about the www vs https.
Chrome marks a site as Not Secure when it cannot verify a safe, encrypted HTTPS connection. This usually happens due to missing SSL, certificate errors, or insecure resources loading on the page.
If your site still runs on HTTP, Chrome will label it as a not secure web page. HTTPS requires an SSL certificate to encrypt data between the browser and the server.
Without SSL, any information submitted through forms, login fields, or search boxes travels in plain text. Chrome flags this immediately to protect users. Installing an SSL certificate is the first and most critical step to fix a not secure website.
SSL certificates are time-limited. If a certificate expires or fails validation, Chrome treats the site as unsafe without warning.
This issue often occurs when auto-renewal fails or when a certificate is installed incorrectly. Even one day of expiration can trigger the “Your connection to this site is not secure” warning. Regular monitoring prevents this problem.
Mixed content occurs when an HTTPS page loads HTTP resources, such as images, scripts, or stylesheets.
Chrome blocks or warns about these insecure elements because they weaken encryption. Common causes include hard-coded image URLs, old plugins, or third-party scripts. Fixing mixed content is essential for restoring full HTTPS trust.
Sometimes SSL is installed, but the server configuration breaks encryption. This happens due to missing certificate chains, incorrect ports, or improper web server settings.
Chrome cannot validate the full security path, so it marks the site as not secure. This issue is common on custom servers and poorly configured hosting environments.
Improper HTTP to HTTPS redirects or outdated DNS records confuse Chrome and break secure connections.
If some URLs still resolve over HTTP, Chrome shows security warnings. DNS propagation issues and cached redirects also contribute. Clean redirects and correct DNS settings eliminate this problem permanently.
This section covers the exact process to fix a not secure website fix permanently.
The most effective way to eliminate the “Not Secure” warning is to ensure your hosting environment is secure by design. When SSL is handled at the server level rather than through a plugin, you eliminate the “handshake” errors that often trigger Chrome’s alerts.

To avoid manual configuration errors, look for hosting that handles SSL by default. Platforms like Rocon automate the installation and renewal process, ensuring every page loads over HTTPS without you needing to touch a single line of code.
By using a platform that handles encryption natively, you ensure that your site is protected from day one without needing to manage complex certificate files.
Open your site in Chrome and click the warning icon near the URL. Check if HTTPS appears with errors.
You can also log in to your hosting dashboard and confirm whether an SSL certificate exists.
If SSL is missing or expired, install or renew it immediately.
Most modern hosting providers offer:
After installation, wait a few minutes for activation.
Installing SSL alone is not enough. You must redirect all HTTP traffic to HTTPS.
Set a permanent redirect so users and search engines always land on the secure version.
Edit your .htaccess file:
# Force HTTPS Redirect
<IfModule mod_rewrite.c>
RewriteEngine On
RewriteCond %{HTTPS} off
RewriteRule ^(.*)$ https://%{HTTP_HOST}%{REQUEST_URI} [L,R=301]
</IfModule>
Edit your Nginx Config:
# Force HTTPS Redirect for Nginx
server {
listen 80;
server_name yourdomain.com www.yourdomain.com;
return 301 https://$server_name$request_uri;
}
Always back up your configuration files before making changes.
Mixed content remains the most common reason behind a site not secure fix issue.
Check for:
To identify the specific assets causing your ‘Not Secure’ warning, you can run a free scan at Why No Padlock.
Update every asset to HTTPS. Do not ignore warnings in Chrome DevTools.
Old internal links can still point to HTTP pages. Update:
This step removes silent security warnings.
Clear the cache from your Chrome browser:
Reload your site in Chrome. The Not Secure warning should disappear.
WordPress sites often show security warnings due to configuration issues. Start by checking:
Both must use HTTPS. Next, inspect themes and plugins. Some hard-coded HTTP assets create mixed content errors.
Avoid relying only on plugins for security fixes. Server-level HTTPS enforcement works better and avoids repeated issues.
When Chrome flags a website as “Not Secure,” it’s a warning meant to protect you—not a message to ignore. While site owners are responsible for fixing security issues, users also need to take smart precautions when browsing unsecured pages.
Never enter personal, login, payment, or financial details on a website marked as “Not Secure.” Even basic actions like submitting contact forms can expose your data to interception. If a site cannot protect data in transit, it should not be trusted with private information.
Some websites support HTTPS but fail to redirect users automatically. You can test this by manually replacing http:// with https:// in the address bar.
If the page loads securely with a padlock icon, the site may be safe—but this alone does not guarantee proper security configuration.
Security-focused browser extensions can reduce risk. Tools like HTTPS-enforcing extensions automatically load secure versions of websites when available, minimizing accidental exposure to insecure connections. These tools act as a safety net, not a replacement for proper website security.
Chrome includes built-in protections such as enhanced safe browsing, malicious download warnings, and phishing alerts. Keeping these features enabled helps block unsafe pages before they load and alerts you when a site poses a potential risk.
If you rely on a website for services or information and see a “Not Secure” warning, consider notifying the site owner or support team. Many warnings exist simply because SSL is missing or misconfigured. A quick report can help them fix the issue and protect other users.
Fixing the “Not Secure” warning in Chrome is no longer optional. That alert directly impacts user trust, bounce rates, and search visibility.
Once you understand how to fix a not secure website in Chrome—by enabling SSL, forcing HTTPS, and removing mixed content—the path forward becomes clear and measurable.
The easiest way to prevent these issues long-term is to choose secure WordPress hosting that handles security at the server level.
Rocon includes free SSL certificates with automatic renewal, enforced HTTPS, and proper certificate configuration by default. This removes common causes of Chrome warnings such as expired SSLs, broken redirects, and misconfigured encryption.
Maintaining a “Secure” status in Chrome is not a one-time task; it requires ongoing oversight. You can prevent future warnings by adopting a “Security First” maintenance routine.
You can prevent Chrome’s “Not Secure” warning by maintaining a valid SSL certificate, enforcing HTTPS at the server level, and monitoring security regularly. When SSL renewals, redirects, and encryption are automated, Chrome never sees a broken or insecure connection.
Most “Not Secure” warnings on established sites are caused by expired certificates. Ensure your SSL provider supports ACME protocols for automatic renewal. Managed environments like Rocon monitor these expiration dates 24/7 and renew certificates automatically, ensuring there is never a “gap” in your site’s security.
Relying on plugins or manual redirects is risky. Server-level HTTPS enforcement ensures every request loads securely, even if a user enters an HTTP URL directly.
Whenever you add new images or third-party scripts, ensure they are using HTTPS URLs. A quick monthly scan using tools like Why No Padlock can help you catch these issues before Chrome flags them to your visitors.
The safest long-term solution is hosting that installs SSL, renews certificates, and handles HTTP-to-HTTPS redirects by default. This removes configuration errors that commonly trigger “Not Secure” alerts.
The more moving parts you have (different vendors for SSL, DNS, and Hosting), the higher the chance of a configuration break. Using a unified platform—where the hosting provider manages the SSL and the redirect logic together—drastically reduces the surface area for technical errors.
If Chrome still shows a “Not Secure” warning, it usually means something is misconfigured. Follow this checklist to resolve most issues quickly and restore site security.
Completing these steps resolves the majority of “Not Secure” website problems and ensures users see the padlock icon.
A “Not Secure” warning is not a failure—it’s a fixable configuration issue. When SSL is installed correctly, HTTPS is enforced, and mixed content is removed, Chrome immediately restores the secure indicator.
Beyond the fix, long-term security depends on prevention. A well-managed hosting environment that handles SSL renewal, redirects, and encryption automatically removes ongoing risk.
This keeps user trust intact, protects search visibility, and ensures your site stays secure without repeated manual intervention.
The “Not Secure” warning appears when Chrome detects that your site is not using HTTPS or has an improperly configured SSL certificate. It indicates data exchanged with the site is not fully encrypted.
HTTPS encrypts data between your server and visitors, protecting sensitive information. It improves security, builds user trust, and is a ranking factor for search engines.
Install a valid SSL certificate, update all internal links to HTTPS, fix mixed content issues, and set permanent HTTP-to-HTTPS redirects.
Avoid entering personal or financial information, manually use HTTPS if available, enable browser security settings, and consider extensions like HTTPS Everywhere.
Check that the SSL certificate is valid and active, fix mixed content errors, enforce HTTPS with redirects, and clear browser and CDN caches.
Yes. Ensure your SSL is installed correctly, update all URLs to HTTPS, resolve mixed content, and configure server-level HTTPS enforcement.
William is a WordPress hosting expert with over 7 years of experience helping businesses and agencies optimize, scale, and secure their websites. He specializes in managed WordPress solutions, container-based hosting, and performance optimization, providing practical insights for both beginners and advanced users.
Elevate your WordPress hosting with 30-day money-back guarantee, free migration, and 24/7 support.
Sign Up Today
Before You Go… Get 1 Month FREE on Rocon Hosting!

Experience lightning-fast speeds

No downtime or hidden fees

Dedicated 24/7 expert support


Leave a Reply