Introduction: How to Generate DKIM Record For My Domain
How to Generate DKIM Record For My Domain: The DomainKeys Identified Mail (DKIM) protocol is a crucial email authentication system that serves to authenticate the sender’s identity and deter email spoofing.
The inclusion of a DKIM record in the DNS of your domain can guarantee the trustworthiness of your emails by receiving servers, therefore decreasing the probability of your emails being classified as spam or refused. The following article will provide a detailed breakdown of the procedures involved in creating a DKIM record for your domain.
Understanding DKIM
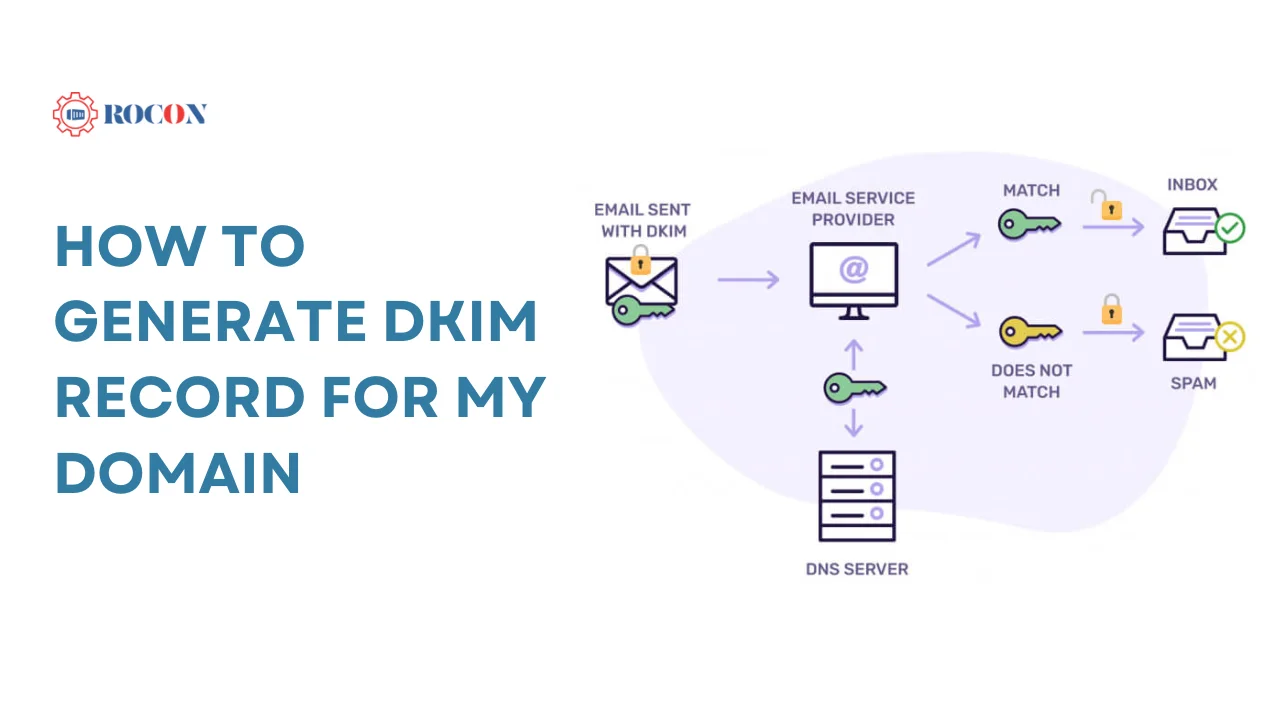
The DKIM system operates by adding a digital signature to the header of your outgoing email messages. This signature is generated using a designated private key, and the corresponding public key is made available in the DNS of your domain as a TXT record.
Once an email is received, the recipient’s mail server use the public key to authenticate that the email’s signature corresponds to the content, therefore validating that the email was indeed sent by the domain it purports to originate from and that it remained unaltered during transmission.
Prerequisites
Before generating a DKIM record, ensure you have the following:
- Access to DNS Settings: You need administrative access to your domain’s DNS settings to add the DKIM TXT record.
- Email Service Provider: DKIM keys are often provided by your email service provider (ESP) or email hosting service.
How to Generate DKIM Record For My Domain
There are generally two approaches to generating a DKIM record:
1. Using Your Email Service Provider
Most email service providers automatically generate DKIM keys for you. Here’s how you can do it:
- Log in to Your ESP Account: Access your account with your email service provider.
- Navigate to DKIM Settings: Look for email authentication settings, usually under security or domain settings.
- Generate DKIM Key: Your provider should offer an option to generate a new DKIM key. This process will provide you with the public key that you need to publish in your DNS.
- Copy the DKIM Record: Once the DKIM key is generated, the provider will give you a TXT record to add to your domain’s DNS settings. It will look something like this:makefile
Name: selector._domainkey.yourdomain.com
Type: TXT
Value: v=DKIM1; k=rsa; p=MIGfMA0GCSqGSIb3DQEBAQUAA4GNADCBiQKBgQ…
2. Manual Generation
If your ESP does not automatically generate DKIM keys, you can create them manually:
- Generate Private and Public Keys: Use a DKIM key generator tool or an OpenSSL command to create a pair of private and public keys.
Example using OpenSSL: vbnet
openssl genrsa -out private.key 2048
openssl rsa -in private.key -pubout -out public.key
- Save the Private Key: The private key should be securely stored on your mail server. Never share it publicly.
- Format the Public Key: The public key must be formatted properly to be published as a DKIM record. It should look like this:css
v=DKIM1; k=rsa; p=MIGfMA0GCSqGSIb3DQEBAQUAA4GNADCBiQKBgQC…
- Create the DKIM TXT Record: Add the public key to your DNS settings as a TXT record.
Adding the DKIM Record to Your DNS
Once you have your DKIM TXT record:
1. Log in to Your DNS Management Console: This could be your domain registrar, hosting provider, or third-party DNS provider.
2. Add a New TXT Record: Go to the DNS management section and select “Add New Record.”
- Name/Host: This is typically selector._domainkey.yourdomain.com, where “selector” is a unique name to differentiate between different keys.
- Type: Select TXT from the dropdown menu.
- Value: Paste the DKIM public key provided by your ESP or the one you generated manually.
3. Save the Record: After entering the information, save the record. It might take some time for DNS propagation.
Testing Your DKIM Configuration
After adding the DKIM record to your DNS, it’s essential to verify that it’s working correctly:
- Send a Test Email: Send an email from your domain to a Gmail or Yahoo account, which both show DKIM verification status in the email headers.
- Check Email Headers: View the email’s full headers in the recipient’s inbox and look for the DKIM status. It should indicate whether the DKIM check passed or failed.
- Use Online DKIM Tools: Several online tools allow you to test your DKIM setup. Enter your domain and selector to verify that the DKIM record is correctly published and functioning.
Troubleshooting Common DKIM Issues
If your DKIM setup isn’t working as expected, consider the following troubleshooting tips:
- DNS Propagation: DNS changes can take some time to propagate. Wait for a few hours and then test again.
- Incorrect Key Formatting: Ensure that the public key is correctly formatted and doesn’t contain any extraneous spaces or line breaks.
- Selector Issues: Verify that the selector you’re using matches the one configured on your mail server.
- Misconfigured DNS: Double-check that the DKIM record is added as a TXT record under the correct subdomain.
Best Practices for DKIM Implementation
To ensure the effectiveness and security of your DKIM setup, follow these best practices:
- Rotate DKIM Keys Regularly: Regularly generate new DKIM keys to minimize the risk of key compromise.
- Use Multiple Selectors: Using different selectors for different email streams (e.g., transactional vs. marketing emails) can improve security.
- Monitor DKIM Reports: Set up DMARC reports to monitor DKIM authentication and identify any issues with email delivery.
Importance of DKIM in Email Deliverability and Security
DKIM plays a crucial role in ensuring your emails reach the intended recipients without being flagged as spam or rejected by receiving servers. Here’s why DKIM is so important:
- Email Authentication: DKIM provides a way to verify that the email sender is legitimate and that the message hasn’t been tampered with during transit. This authentication process is vital for maintaining trust with email recipients and email service providers (ESPs).
- Combatting Email Spoofing: Email spoofing is a tactic used by cybercriminals to send emails that appear to come from a trusted source. DKIM helps prevent this by allowing the recipient’s server to verify that the email was actually sent by the domain it claims to be from.
- Improved Email Deliverability: Emails that pass DKIM checks are more likely to be delivered to the inbox rather than the spam folder. This is because ISPs and mail servers use DKIM as one of the factors in determining whether an email is legitimate.
- Enhanced Reputation with ISPs: Implementing DKIM can improve your domain’s reputation with Internet Service Providers (ISPs). A good reputation is essential for ensuring high email deliverability rates.
Integrating DKIM with Other Email Authentication Methods
While DKIM is powerful on its own, it works even better when integrated with other email authentication methods like SPF (Sender Policy Framework) and DMARC (Domain-based Message Authentication, Reporting, and Conformance).
SPF (Sender Policy Framework)
SPF is an email authentication method that allows the owner of a domain to specify which mail servers are permitted to send email on behalf of their domain. When a recipient’s mail server receives an email, it checks the SPF record to verify that the email was sent from an authorized server.
- SPF Record Setup: Similar to DKIM, SPF requires the creation of a TXT record in your domain’s DNS. The SPF record lists the IP addresses and hostnames that are authorized to send emails on behalf of your domain.
- SPF and DKIM Together: While SPF verifies the sender’s IP address, DKIM ensures that the email content hasn’t been altered. Together, they provide a robust framework for email authentication.
DMARC (Domain-based Message Authentication, Reporting, and Conformance)
DMARC builds on SPF and DKIM by providing a way for domain owners to publish policies on how to handle emails that fail authentication checks. It also allows domain owners to receive reports on the authentication results, which can be used to monitor and improve email security.
- DMARC Record Setup: Like SPF and DKIM, DMARC requires the creation of a TXT record in your DNS. The DMARC record specifies the policy for handling emails that fail authentication, such as whether they should be rejected or quarantined.
- Benefits of DMARC: Implementing DMARC with DKIM and SPF helps prevent email spoofing and phishing attacks, improves email deliverability, and provides valuable insights into email traffic through DMARC reports.
DKIM Key Management Best Practices
Proper management of DKIM keys is essential for maintaining the security and effectiveness of your email authentication setup. Here are some best practices to follow:
- Key Rotation: Regularly rotate your DKIM keys to minimize the risk of compromise. Key rotation involves generating new DKIM keys and updating the corresponding DNS records.
- Key Length: Use a key length of at least 2048 bits to ensure strong encryption. Some older systems may use 1024-bit keys, but these are less secure and more vulnerable to attacks.
- Multiple Selectors: Use different DKIM selectors for different types of emails (e.g., transactional vs. marketing) to compartmentalize and manage key rotations more effectively.
- Monitoring and Logging: Regularly monitor your DKIM setup for any issues and keep logs of key generation and rotation activities. This helps you stay on top of any potential security issues and ensures your email authentication setup is functioning correctly.
Common Mistakes to Avoid When Setting Up DKIM
While setting up DKIM, it’s important to avoid common pitfalls that can undermine the effectiveness of your email authentication:
- Incorrect DNS Record: Ensure that the DKIM TXT record is correctly formatted and published in the right subdomain (e.g., selector._domainkey.yourdomain.com). Mistakes in the DNS record can lead to DKIM failures.
- Not Using a Strong Enough Key: Using a key length of less than 2048 bits can weaken your DKIM security. Always opt for 2048-bit keys or higher.
- Failure to Monitor DKIM Results: After setting up DKIM, it’s crucial to monitor the results to ensure that your emails are passing DKIM checks. Use tools or DMARC reports to keep an eye on authentication status.
- Neglecting Key Rotation: Failing to rotate your DKIM keys periodically can increase the risk of key compromise. Set up a schedule for regular key rotation.
How DKIM Fits into a Broader Email Security Strategy
DKIM is an important component of a broader email security strategy that includes multiple layers of protection. Here’s how DKIM fits into the bigger picture:
- Complementing SPF and DMARC: DKIM works alongside SPF and DMARC to provide comprehensive email authentication. Each method addresses different aspects of email security, making them more effective when used together.
- Preventing Phishing Attacks: By authenticating your emails, DKIM helps prevent phishing attacks that rely on email spoofing. This is especially important for protecting your brand’s reputation and maintaining customer trust.
- Securing Email Content: DKIM ensures that the content of your emails remains unchanged during transit, which is critical for maintaining the integrity of sensitive information.
- Enhancing Trust with Recipients: Implementing DKIM and other email authentication methods signals to recipients and ISPs that your emails are legitimate and trustworthy, improving your overall email deliverability.
DKIM Troubleshooting Tips
If you encounter issues with your DKIM setup, here are some troubleshooting tips to help you resolve them:
- Check DNS Propagation: After adding or updating your DKIM record, allow time for DNS propagation. It can take several hours for changes to take effect globally.
- Verify Selector Name: Ensure that the selector name used in your DKIM record matches the one configured on your mail server. A mismatch can cause DKIM failures.
- Use DKIM Testing Tools: Online tools like DKIMCore and MXToolbox can help you verify that your DKIM record is correctly published and functioning.
- Inspect Email Headers: Review the headers of sent emails to ensure that the DKIM signature is present and that the verification status is “pass.”
- Consult Your ESP’s Support: If you’re using an email service provider, reach out to their support team for assistance with DKIM issues. They may be able to provide specific guidance based on their system.
Conclusion: How to Generate DKIM Record For My Domain
Generating and implementing a DKIM record for your domain is a vital step in securing your email communications and enhancing your email deliverability. By following the steps outlined in this guide, you can ensure that your emails are authenticated, trusted by recipients, and protected against spoofing and phishing attacks.
DKIM, when combined with SPF and DMARC, forms a powerful trio that bolsters your email security and reputation. Regularly monitor and maintain your DKIM setup, rotate keys as needed, and stay vigilant against potential threats. With these practices in place, you can confidently manage your domain’s email communications, ensuring they reach the intended inboxes safely and securely.
FAQs
Q1. How are DKIM keys generated?
DKIM (DomainKeys Identified Mail) keys are generated by your email service provider. They create a private key stored on their servers and a public key that you add to your domain’s DNS records as a TXT record. This allows your emails to be authenticated as coming from your domain.
Q2. How to get DKIM record for a domain?
To get the DKIM record for your domain, log into your email service provider’s dashboard (like Google Workspace, Microsoft 365, or any email provider). They will generate a public DKIM key that you can copy. You’ll then add this key to your domain’s DNS settings as a TXT record.
Q3. How to set up SPF and DKIM TXT records for your domain?
To set up SPF and DKIM records:
- SPF Record: Add a TXT record in your domain’s DNS with the SPF information provided by your email service (usually starts with “v=spf1”).
- DKIM Record: Add a separate TXT record with the DKIM public key in your domain’s DNS. Check with your email service provider for the exact values and steps.
Q4. How to set up DKIM?
To set up DKIM:
- Generate the DKIM key using your email provider.
- Log into your domain registrar (like GoDaddy or Namecheap).
- Add the DKIM TXT record to your domain’s DNS settings.
- Save and wait for DNS propagation, which can take a few hours to complete.
Q5. Who creates DKIM records?
Email service providers typically create DKIM records. They generate the DKIM keys—both private (stored securely on their servers) and public (which you add to your domain’s DNS). This ensures email authentication for your domain.


Leave a Reply